I'm sorry I missed my post last week! I've been very busy trying to get the car up and running for Ontario Time Attack weekend. My maintenance check list quickly turned in to a week long endeavour, and I've been working hard to get the car road worthy again!
When I transitioned from sim racing to grass roots motor sports, I expected that the mechanical side of things would be a learning curve for me. Obviously, in iRacing, you don't need to worry about doing your digital oil changes, or rotating your digital tires. You simply load up the session you want, and drop the car on track, totally clean and freshly tuned to your liking. What I didn't anticipate though, was how much the car was going to challenge me. In real life, you can't just load up your car and track and do some practice laps whenever you want. Track time is very limited, and even more so if mechanical issues prevent you from getting out on track. This means that car prep is everything, and it's very jarring going from being able to lap on an empty track until my hearts content, to spending that time obsessing over my maintenance check list in an attempt to make sure my car was ready for it's one hour of track time. What I'm trying to say here is I spend a lot of time lying down in my driveway, and this past week was a real test of my resolve.
The List
My check list for the weeks leading up to track season consisted of the following.
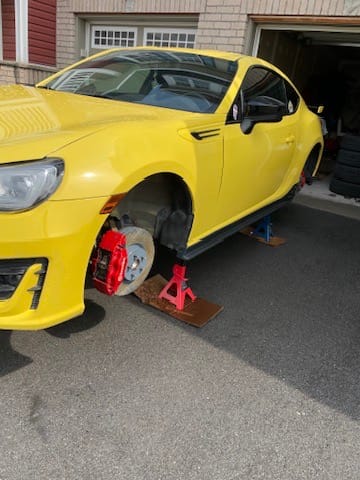
#1 Wheel Bearing. One of my wheel hubs was making a lot of noise, and needed to be replaced. I had the opposite side one replaced last year after the noise started to drown out my radio. The shop I took it to charger me over $1000 to change a $200 part, so I figured this time I would do it myself. Something I may never do again.
#2 Brake Rotors. The rotors I put on last year were warped by the end of the summer. It was a slight warp, and the car was still drive-able, the pulsating brakes barely noticeable on the street. But at the track, under heavy braking, the pulsating turns in to a violent shake. So I bought some new ones which I installed. The rotors installed without issue, but my fancy Brembo calipers had other plans.
#3 Normie stuff. I had planned to do a few quality of life items, like filters, brake and clutch bleed, oil change etc. On further inspection, though, the clutch fluid was fine and the intake filter still looked new. I changed the cabin air filter (which had leaves in it.) The brake bleed is pending the reattachment of my front caliper, and I'll change the oil after Ontario Time Attack (it has less than 3000 kms on it, but might have a bit of engine confetti in it from the fresh rebuild.)
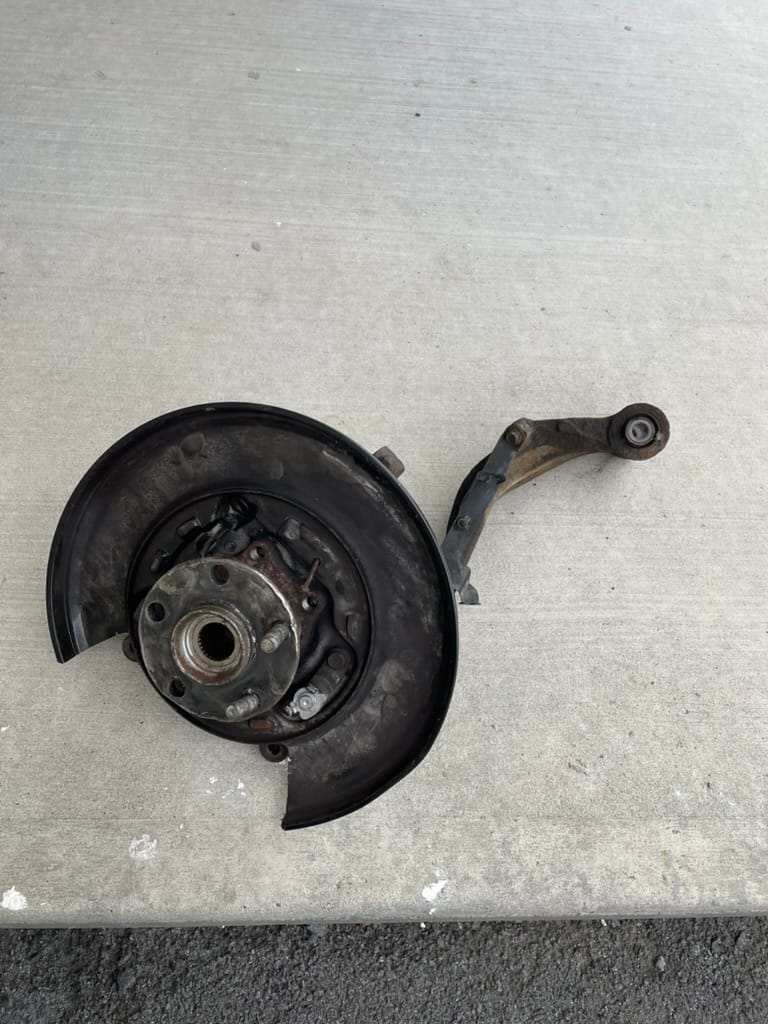
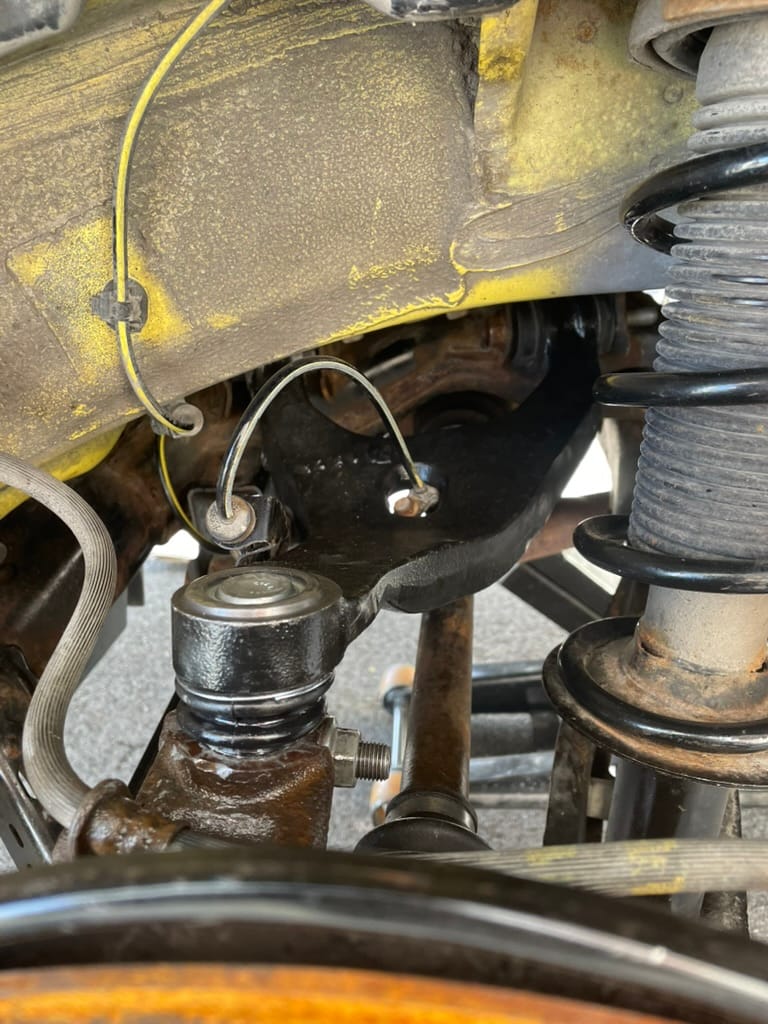
The Wheel Bearing
For the sake of clarity, I know the wheel bearing is housed inside the wheel hub. The hub is the part that I replaced, because these Subaru bearings aren't serviceable. In theory, a wheel hub replacement is a pretty rudimentary process. I was able to remove all of the bolts holding the wheel bearing in with relative ease. Unfortunately, this is where the the easy part ended.
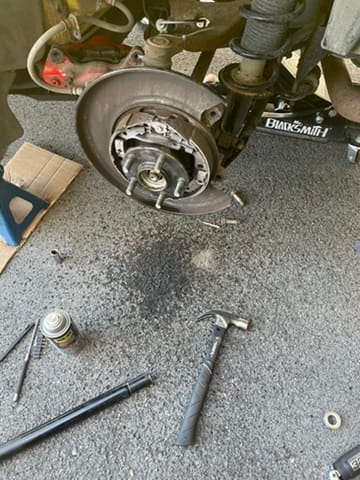
Most of you reading this know what it's like to work on cars above the rust belt. Bolts are stuck, ball joints are stuck, and wheel hubs (you guessed it) are stuck. When I first realized that the wheel bearing wasn't going to come out with a few taps of the hammer, I took to the internet to do some research. I found many resources about how to remove them, all of which stating that Subaru rear wheel bearings are some of, if not the most stubborn wheel hubs to remove.
In hindsight, this was the point where I should have cobbled the rear end back together, and either taken it to my local DIY garage and rented a lift, or taken the car to a shop and had them deal with it. I did neither of these things.
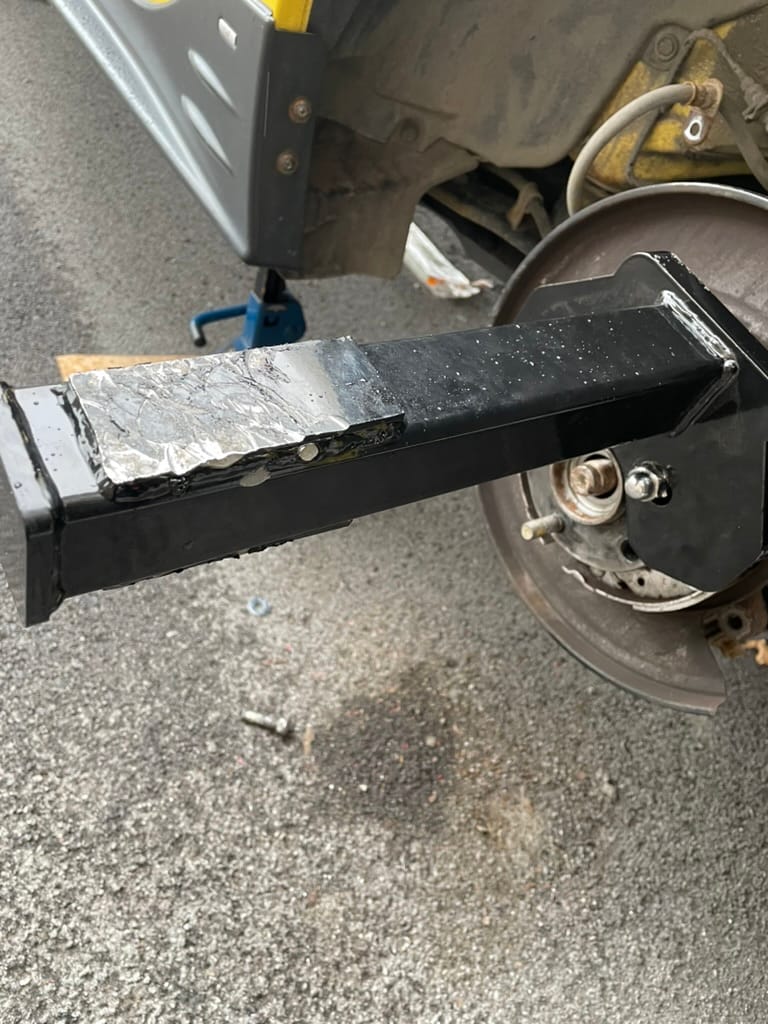
After multiple days of hammering, and brand new hub removal tool later, the wheel hub showed no sign of removal. At this point, the hub was beyond putting it back together, and the car was stuck on jack stands. The driveway made this job more painful than it needed to be. It made it really difficult to get a good swing on the hub, and risked me causing damage to the other components of the suspension, or the body panels if a swing went really stray.
I decided the best way to continue was to take the hub to a shop that could safely press it out for me. But in order to get there, I needed to take the whole knuckle off. This was a battle in itself, as I become acutely aware that the Mastercraft socket set I've had for years didn't have the beef that I needed to work on rust belt suspension components. I managed to remove all the bolts connection the steering knuckle to the car using the tried and true "use the jack handle as leverage" method. The ball joint connecting the knuckle to the upper control arm, however, was firmly seized, and I didn't have the tools to remove it.
After a brief mental breakdown and a few phone calls, I learned that the upper control arm was held on by just two bolts. With my trusty jack handle, I was finally able to free the knuckle from the car, seized ball joint and upper control arm attached. I happily took the rusty parts to a friend's shop to be pressed out.
The hub itself was put in a hydraulic press which was pumped up to 17 tons, which I assumed would be more than enough to free the hub from the knuckle.
It wasn't.
The torch and air hammer that were used on it while it was under all that pressure, thankfully, was.
With the hub now separated from the knuckle, the rest of the job has been relatively simple. In the rust belt, together is always easier than apart. I cobbled together some hardware from a bin of used bolts to replace the nuts and bolts I had ruined with the hammer, and bolted everything back together with no issue.
Unfortunately for me, I ruined the boot on the ball joint connecting it to the knuckle. The ball joint itself isn't serviceable (a theme I'm picking up on with my Subaru) so I've ordered a new control arm, which is the last piece of the very rusty puzzle.
If only that were my only problem.
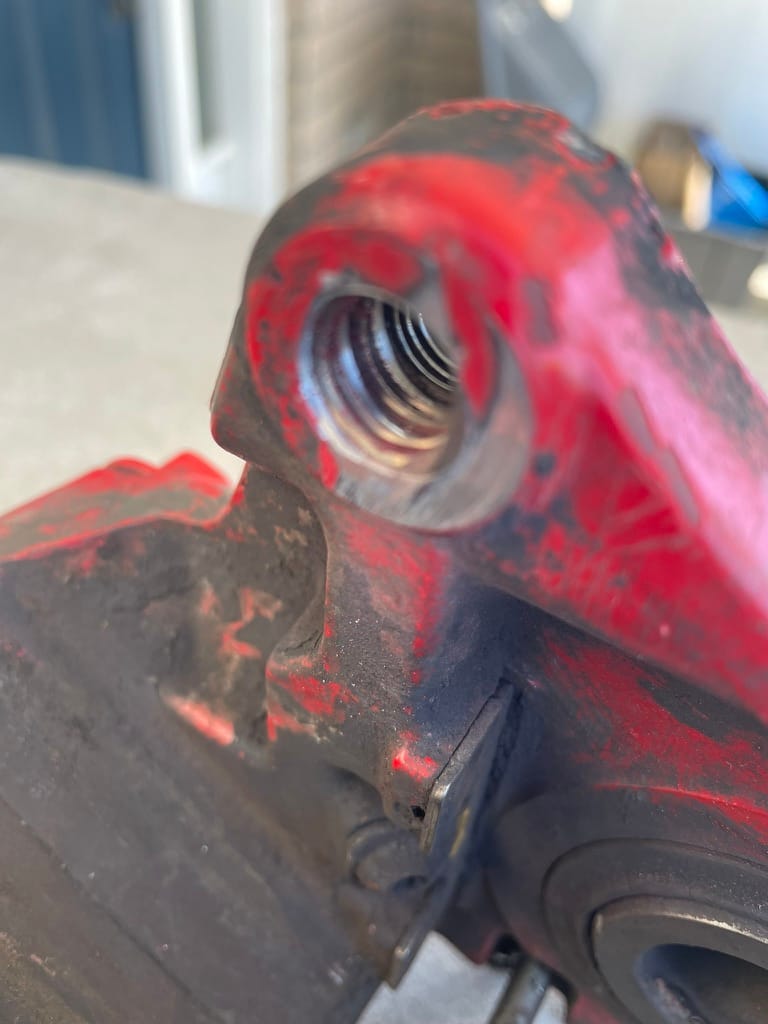
The Brake Caliper
Swapping out my front brake rotors was supposed to be an easy job. And usually it is. My BRZ has big Brembo calipers all the way around, and are easy to remove to replace rotors. There are two mounting bolts holding the caliper on, which can be removed with, or without taking out the brake pads. What I didn't know, though, is that the calipers are made of aluminum, which is on the softer side of metals, and Subaru uses steel mounting bolts. This combination means that if you, or the shop who works on your car, doesn't take care when re-installing the brake caliper, it is very easy to over-torque the caliper, pulling the mounting threads clean off.
This turn of events prompted my second maintenance season emotional breakdown. Replacements for the big Brembo front calipers are just shy of $3000 from the dealership. For one caliper. So I turned to my support network to figure out what my options were.
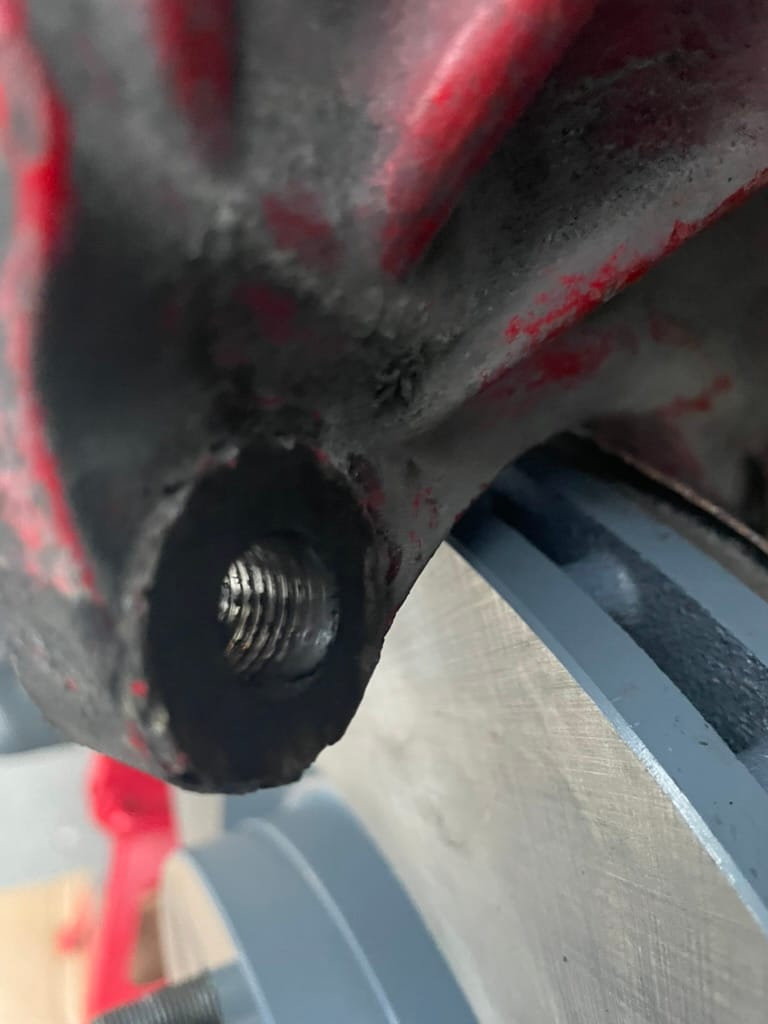
Lucky for me, accidental thread removal of fixed calipers on Subarus is incredibly common, The issue is shared by Subaru's WRX platform, and the community is mostly in agreement that a Heli Coil, or thread repair kit will not only solve the problem, but improve the strength of the threads in the mounting holes.
If your interested, I also briefly considered buying a used set of WRX STI front calipers, which should mount up like they were there from factory. This was my plan B if I experienced any issues with the Helicoil.
If you came across this post because you are also having problems reinstalling a brake caliper on your WRX or BRZ, this forum post provides an extensive guide on how to do the repair with precision, assuming you have access to drill press. I had a friend do mine in his vice with a cordless drill, though, and my caliper is installed just the same.
The Learning Opportunities
Multiple times throughout the last week, I considered cutting my losses and selling the BRZ. I considered calling a tow truck and having them drag it off to a shop to get everything fixed, which surely would have cost me much more than I can afford. I wanted to quit. But if you've read my previous posts about my Focus, then you know I've been in this situation before. And having been here before, I was able to find the will to keep going. I wasn't going to let this car beat me, not this time, and not ever.

I should point out that, despite having to remove parts of my rear suspension, and replacing parts I had no intention of replaces, the price of which still came in well under what I paid a shop to do the opposite wheel hub. And on top of that, I now know who to remove and replace most of the hardware that makes up my rear suspension.
I also now know how to properly install a Helicoil, and might even be able to do it myself in whichever one of my mounting holes fails next.
Cars are pain, even more so in places where they salt the roads in the winter. The reality is that affordable sports cars are few and far between now. Your first cool car is probably going to be a few years old, and pretty rusty underneath. A little bit (what felt like a lot, really) of perseverance goes a long way. The car is fixed, I'm not broke, and I've added two new skills to my repertoire!
The End
I write this last section on Monday night, having just come back from a brief test drive in my beloved yellow BRZ. It drives straight, stops, and there are no troublesome lights on the dash. Needless to say, I'm incredibly relieved, and as rewarding as it is to put the car back on the ground after a week on jack stands, I really wish I don't have to do it again any time soon.
Cat Tax